Practical instructions for IRF's website
Johan Arvelius
This instruction in PDF: http://www.irf.se/~johan/webman_en.pdf
This document is a part of the full instructions in Swedish: http://spider.irf.se/intra/doc/webmanual.html
4 Practical treatment
Except scripts that automise the website there are from technical
point of view three categories of documents: documents that shall be
listed by an automatic function (seminars, minutes etc.), usual
documents stored in a database and documents stored as files on the
webserver. The two first categories is handled through the
webinterface http://spider.irf.se/webinterface/intra/.
For documents stored as files an important thing to remember is that
all relative links and pathes is relative to the basic file
index.php. To be able to give relative pathes in the code that
fits with the files place in the filestructure a symbolic link to
http://spider.irf.se/index.php can be done by the command
ln -s /var/www/index.php index.php.
You must not copy index.php to the local directory, it shall be
one file for the whole site in which changes shall give global
effect. It's strongly recomended to make such links whenever a new
directory is created.
4.1 Edit documents in the database
To edit a document stored in the database the most simple way is to go
the webinterface http://spider.irf.se/webinterface/intra/ and log in. Choose the link ``Admin.
Website'' in the left column and go on to the document you want to
edit. If this part of the site is setup according to recommendations
there should be a link ``Modify:'' at the bottom of your page leading
to the database entry. There you could edit directly in the window on
the screen or cut and paste the source to your favourite editor and
reload it using the ``file'' button.
4.2 To add minutes, seminars and news
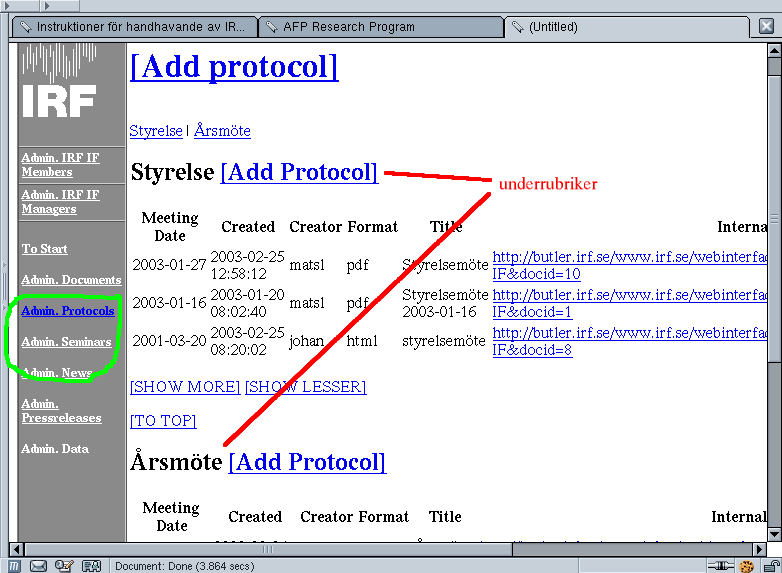
Figure 1: Interacton interface to add minutes
Minutes, seminars and news can easily be added to the database and
will be shown by routines in lists of different kinds on the website without
further treatment. Step by step the process goes as:
- enter http://spider.irf.se/webinterface/intra/ and click LOGIN below the IRF-logo.
- Log in using your username and password, the same as to the
mailserver.
- Yoy will now se a list of links to the groups you have authority
to add documents to. Follow the link of your choice.
- You will now enter an administration interface where it is
possible to chose Admin. Protocols, Admin. Seminars or Admin. News.
(Indicated in Green in Figure 1.) Follow the link
of your choice.
- You'll now enter al list of present documents in the chosen category
according to Figure 1. There might be
sub categories. Follow the link Add
Protocol/Seminar/News in the sub category of your choice.
- Chose and fill the fields of the form.
- Title
- The title is probably used in the list where the
document is shown on the website.
- New category
- Think thoroughly before you add a new category
and make shure to make a new script to get it displayed on the
website.
- Read permissions
- Sets the reading permissions to your
document. Group means the database group in which you are entering
a document , Intranet is all users that has a user account at the
IRF computersystem i.e. all employees as well as all temporary
guests. Public means it can be read by anyone. This does not
automatically mean that it in practice can be found by anyone if
there is no list linking to it that is avalilable to public, but
take care, there might be that someone writes such a list later!
- Write permissons
- Sets the permissions to edit and delete the
document. Creator means your self , the administrator of the group
and the main administrator (probably the PR-manager and/or a
computer manager). Group means everyone in the group.
- Add the document either by choosing a file from your own file
system by entering a filename or use the browse button. As an
alternative the text can be entered directly in the big field.
- End by UPDATE DATABASE.
4.3 The link database
To use the links in the link database you will have to do an ordinary
link in your document to http://spider.irf.se/link/linkname. Through the
web interface to the database http://spider.irf.se/webinterface/intra/ it is possible to see what
links is avalible. This is done by following the link database in the
upper left corner. There are also the full link names available to cut
and past in your code.
To make new entries to the link database:
- Go to the webinterface http://spider.irf.se/webinterface/intra/, log in and follow the
link Link database in the top left corner.
- To avoid double entries, search the database for your target by
following the SEARCH link and write the adress in the field.
- Follow the ADD link at the top of the page.
- Enter the new links name and the target adress in the fields.
- Click UPDATE DATABASE.
- View your new link appear in the list.
To change links in the linkdatabase:
- Go to the webinterface http://spider.irf.se/webinterface/intra/, log in and follow the
link Link database in the top left corner.
- Follow the EDIT link for the link of your choice.
- Enter the new target adress.
- Click UPDATE DATABASE.
NB only the adress is possible to change. The name of the link is
decided once for all and changing it should be in straight
contradiction to the purpose of the database. It is possible to remove
links from the database. Think thoroughly before you do so. This must
only be done if you are really sure that the contents of the target
files are permanently removed from the web. There might be other links
than your own ot the database entry. Try to find all links to
the entry if you really removes it from the link database.
4.4 Other documents, ``normal web pages'' and pictures
In this section the procedure to add web pages to the IRF website that
shall share the plue field on the left. Shortly this is done by adding
the file on the web server or in the database and then make liks to
http://spider.irf.se/index.php with the parameter ?page=filename
for files on the server or the parameters ?dbfile=
databaseentry&dbsec=group for entries in
the database.
4.4.1 Restrictions
There are a few technical specialities that might interfere with the
script that shall read the file in a bad manner and must be avoided.
For the web site to give a uniform impression there are recommendations
on the design by Jenny Br�nnstr�m (http://www.irf.se/intra/webbredaktion/profilmall_030606.pdf). Added files in
simple HTML code with no extra manipulations on the graphical form
will follow these recomendations.
- Absolute coordinates
- As the entered code will not form an own
HTML document but in the end be added as a field in a larger
document including the blue part on the left and probably a header
and a footer parts placed using absolute coordinates in the code
will probably end up in an unexpected and unwanted placement
compared to the rest.
- CSS
- IRF's web site is using CSS in the design of the pages.
These will even be applicated to the pages you will add. CSS's
parsed by the browser will overwrite each other. This means that
added pages with CSS definitions can overrule the common CSS and
mess up the rest of the page. Normally CSS is defined in the head
of the HTML file (between the tags <head> and
</head>). This part of the entered file will be stripped off
by the script and will not affect the page. If you for some reason
really needs other CSS definitions than the default IRF CSS There is
a possibility to write an own CSS file and link it in by another
parameter to the skript http://spider.irf.se/index.php. That is explained in
section .
4.4.2 Add documents to the database
- To add the document to the database follow the instructions in
section 4.2 with the only difference to choose Add
Document.
- To link to the page link http://spider.irf.se/index.php with the parameter
?dbfile=databaseentry&dbsec=
group where group is the user group the document
belongs to usually 'Administration' or a research program ('P1'
etc.). If you link to this document through a menu of a wrapper and
want to link to the document included in that wrapper you could of
course also link to the adress that gets generated by the wrapper
when you click your way there. This adress can be rather long and
messy but it helps the visitor to understand the context by showing
the right sub menu at the same time.
- Example:
- If I have added an entry to the database in group P1
titled ``example'' I shall write the link
<a href="index.php?dbsec=P1&dbfile=example">example</a>
from referring pages in the directory /var/www/ on spider. From
other pages you can chose to write the partial path to test.php or the
full:
<a href="http://spider.irf.se/index.php?dbsec=P1&dbfile=example">example</a>
In the examples in section 4.5 we will continue
to add this document in the wrapper and link to it that way.
4.4.3 Add images
- To add the document to the database follow the instructions in
section 4.2 with the only difference to choose Add
Image.
- To add the picture to a website the PHP function
http://spider.irf.se/webinterface/intra/code/include_db_image.php shall be
used.
4.4.4 Add documents as files
- Put the file you want to add in the tree structure in the
directory /var/www/ on spider. The directory where the file is
placed will decide in which environment the page will be chown. I.e.
a file in the directory /var/www/P1/ will get a row of links
for navigation on the atmospheric physics pages at the top of the
page.
- To link that page a link to http://spider.irf.se/
subdirectory/wrapper.php shall be made with the
parameter ?page=filename. If this is not
working it is probably due to that there are no symbolic link to
http://spider.irf.se/index.php from the sub directory where the file is added. Such
a link can easily be added by the command
ln -s /var/www/index.php index.php.
You must not copy index.php to the local directory, it shall be
one file for the whole site in which changes shall give global
effect. As an alternative a link to
http://spider.irf.se/index.php?page=
subdirectory/filename, can be made. This will result
in a page with a header etc that is common with the IRF main page.
The drawback with this method is that you must make sure all links
on the page has links relative to /var/www/. Even for files
it is better to link to the adress generated by the wrapper as
discussed in section 4.4.2.
- Example:
- If I have added a page /var/www/
P1/example.html I shall make the link
<a href="P1/index.php?file=example">example</a>
from pages in the directory /var/www/ on spider. From
other pages either the relative searchpath to index.php
or the whole:
<a href="http://spider.irf.se/P1/index.php?file=example">example</a>.
In the examples in section 4.5 we will continue
to add this in the wrapper and link to it that way.
4.5 Pages with page head
To add files to generate the dynamically generated page heads there is
a template. This template also contains code in a way that makes it
work as a wrapper-file. In order to add a set of web pages with a
common page head e.g. a new project or instrument according to this
template do as following. The wrapper file to the page shown in
Figure is prepared with this template. In situations
where the template is not usable there are instructions to write a new
wrapper from scratch in section .
- Copy the file
/var/www/skeleton/wrapper.php.
- Set the headline for the page. This can be done either by a
image logotype, a text headline or both. If both are used the image
logotype will be placed in top and the text headline under. This can
be used e.g. to add a new project with the research program logo at
the top of the page and then a text headline of the project. To the
image logotype a link can be added by the variable
$imglogourl="URL";. To the image logotype
a text alternative with the same text should be entered by
$logoalt="alt text";. The path to the image
logo is set by $imglogo="
relativ/path/to.file"; while the text headline is
set by $textlogo="Headline";. In
Figure an example with image logo is shown.
- Insert the names of the main links that shall be shown under the
headline. They shall be entered in order by
$linkname[x][0]="linkname";
- Add names of any sub-links that shall fall out in menues to the
main links while these are activated. These are added in the same
way; $linkname[x][y]="
linkname";. Sublinks with the first coordinate
x appears in order after y under the
main link x when it is activated.
- Links leading ``out'', id est pages that shall not be shown
within the same wrapper is added by writing
$linkurl[x][y]="url";
directly after the link name. For wrappers that are not top level,
eg a reseach project within a project that shall have an own wrapper
recomended to add such as $linkname[0][0] leading
back to the previous level.
- Add whatever shall be shown when the links are activated either
by adding HTML-code directly or include other files in the
corresponding else if clause. To include files or documents
in the database that by them selves are complete HTML-documents
there are two ready scripts that can be used to strip off parts of
the HTML code that must not appear in the middle of the document.
- http://spider.irf.se/webinterface/intra/code/include_local.php is a PHP
script that takes one argumend file=file and returnes
the contents of the file file from the local
filesystem stripped according to section .
- http://spider.irf.se/webinterface/intra/code/include_db.php is a PHP script
that takes the arguments dbfile=file and
dbsec=group, where group is the user
group the document belongs to usually 'Administration' or a research
program ('P1' etc.), and returns the contents of the document
file in the database in the same way.
Both these script shall be called with 'include' to make sure that any
PHP code in the files shall be interpreted, the scripts by themselves
only returns exactly the contents in the file left after the
stripping.
These scripts are hailed in the end of the file, thereby it is enough
to get one file from the filesystem or the database it's enough to set
the variable $file=file or $dbfile=
file respectively, the admin variable is already set.
- Add the file to the database according to
section 4.4.2 or directly on the webserver according to
section 4.4.4. It is important that it has the ending
.php in the file name.
- As http://spider.irf.se/index.php starts to look for a wrapper in the current
directory the file shall be called wrapper.php if it shall be
the defalult wrapper to the current directory. Then there must also
be an symbolic link to http://spider.irf.se/index.php.
- Linking to the documents that shall be included with the new
wrapper explicitly is made as usual. The adresses gets a little
peculiar. NB the &-signs that appears in the adresses must be
written & in the links that shall be interpreted by
the browser as & has a special meaning in HTML as explained in
, on the other hand in the include commands
there must not be any & as this is a command in PHP
and not HTML.
- Example 1:
-
To add the example
document added to the database in section 4.4.2 to
the sub menu to the second menu in the page head I add
$linkname[1][1]="new file"; in the wrapper and then
include
"http://spider.irf.se/webinterface/intra/code/include_db.php?dbfile=exempel&dbsec=P1"
in the else if ($link[1][1]) statement.
- Example 2:
- To link to the document from somewhere else I'll
write a link
<a href="http://spider.irf.se/P1/index.php?link[1][1]=1&chosen=program">example</a>.
- Example 3:
- To add the example file from
section 4.4.4 next to it in the sub menu I add
$linkname[1][2]="newer file"; in the wrapper and then
include
"http://spider.irf.se/webinterface/intra/code/include_local.php?file=exempel"
in the else if ($link[1][2]) statement.
- Example 4:
- To link this file from somewhere else I'll write a
link
<a href="http://spider.irf.se/P1/index.php?link[1][2]=1&chosen=program">example</a>.
File translated from
TEX
by
TTH,
version 3.08.
On 14 Oct 2004, 13:44.